
Bruise Covering Makeup: How to Hide a Bruise Step by Step
A bruise tends to arrive two days before something you can't move: a wedding, a client pitch, the first morning at a new job. There it is on your jaw, or your forearm, or the inside of your elbow, and it's the wrong color entirely, blue-purple in a way no foundation you own will fix.
Bruise covering makeup works better than many expect, but not for the reason they expect. A bruise is a color problem sitting under skin that's otherwise flat, which makes it one of the few things makeup can erase from view at arm's length. The answer isn't more concealer. It's matching the corrector to the stage your bruise has reached, and knowing when the skin underneath isn't ready for product at all.
Decide Whether to Cover Today or Wait
The go or wait call comes before the shade, and it's a short one. Skin that's intact and closed, with no sign of infection and a bruise that's mild to moderate, gets covered once your treating clinician has cleared makeup. Skin that's broken, weeping, blistered or hot waits.
The exclusion list in DermNet's cosmetic camouflage guidance is the spine of that decision: open wounds, ulceration, active infection, blistering, significant inflammation, and post-procedure areas that haven't re-epithelialized. If any of those describes what you're looking at, you don't have a makeup problem. You have a healing problem, and the person to call is whoever treated you.
Run this before you open a drawer.
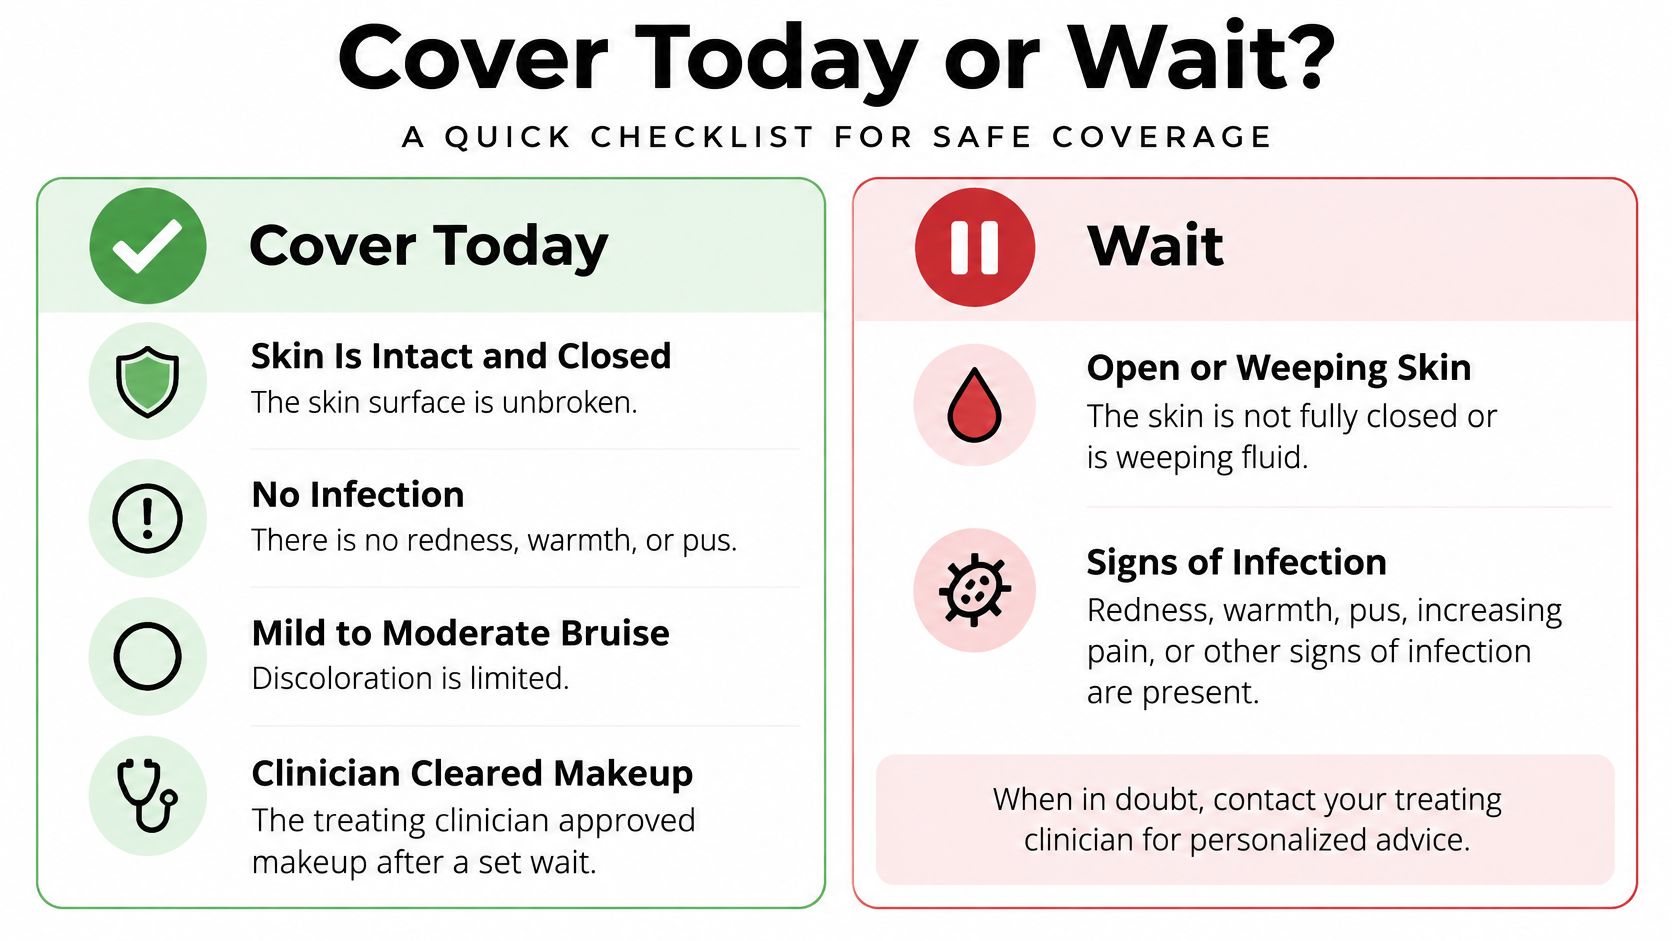
Reading the two columns honestly
Anyone who shouldn't be putting makeup over a bruise usually already half knows it. The skin looks shiny and thin, or there's a scab at one edge, or the color has a border sharper than a bruise should have. Spreading redness that feels warm, pus, or pain that's climbing are stop signals, not layering opportunities. Product sitting on an infection doesn't hide it from a doctor. It hides it from you for another day.
A bruise that's ugly, with skin that looks and feels normal over it, is your green light. Darkness and size don't matter much at this point. Surface condition does.
After laser work or any procedure that leaves the surface compromised, makeup stays off broken or actively healing skin unless the treating clinician approves it. That's the line that matters most, because the ingredient list is not the risk here. Timing is.
Removing it without undoing the day
Take it off the way you'd treat a fresh tattoo: gentle cleanser or micellar water, lukewarm, no cloth scrubbing, pat dry. Friction on healing skin costs more than a leftover smear of concealer, and scrubbing at a scab can leave pigment behind that outlasts the bruise itself.
If the bruise came from a bump rather than a needle, a cold pack in the first hours can limit how much color develops. Follow a guide to how to ice an injury safely instead of pressing ice straight onto bare skin for long stretches. Skip cold entirely if your aftercare says no ice, which some energy treatments do.
At NYC Laser Hair Removal, the treatment area has to be fully washed and free of makeup and medication before treatment. Same principle, reversed: the clinic needs to see your skin, so product goes on after, never before.
The one question to ask first
If you take nothing else from this section, take the question. Ask your provider, in writing if you can: "When can I put makeup over this area, and does anything in my aftercare change that?"
Practical rule: a clinician's aftercare timing overrides every generic makeup instruction you'll read, including mine.
Pick the Right Corrector Shade for Your Bruise
A bruise moves through stages. Day one is usually deep red, purple, or blue. A few days later it shifts blue-green. Near the end it turns yellow-green or yellow-brown. Pick the corrector for the stage in front of you today, not the color you saw on day one. If the skin is still open, weeping, or under aftercare that bans product, wait. Once the surface is closed and safe to cover, shade choice is what makes the cover believable. Makeup hides the bruise. It does not heal it.
Bruise color stage | Corrector to use | Concealer to use |
|---|---|---|
Early: deep red, purple or blue | Peach or orange | Full-coverage, skin-matched |
Middle: blue-green or fading purple | Peach or light orange, used sparingly | Full-coverage, skin-matched |
Late: yellow-green or yellow-brown | Yellow-based corrector | Light, skin-matched concealer, often only one thin layer |
Those windows are approximate. Size, depth, and skin tone all move the calendar. Judge by the color you see in daylight.
Why peach first and yellow later
Orange and peach sit opposite blue and purple on the color wheel. A thin layer neutralizes that cast so the concealer only has to match skin, not fight the bruise. When the bruise turns green and then yellow-brown, the opposing color moves toward yellow. Keep using peach and you get an orange halo that reads louder than the bruise did. I switch to a yellow-based corrector at that point and use less product, not more.
The method is optical, and it is old. Cosmetics and Skin's history of concealers traces high-coverage camouflage to 1928, when the American artist Lydia O'Leary developed a foundation to hide her own port-wine stain, patented as Covermark in 1932. Medical teams later expanded the technique for burned airmen during the Second World War. Guided camouflage can also change how people feel about visible skin conditions, which is why the right stage match matters more than piling on one favorite peach.
Check the edge before you cover the center
Dab a small amount at the outer edge of the bruise, where color meets normal skin, and look in daylight near a window. Adjust there before you commit to the whole mark. A corrector that is too pink or too light turns residual bruising into a bright patch, and the eye finds that faster than it found the bruise. On a late yellow stage, that same edge test tells you whether yellow is enough or whether you have jumped shades too early.
Matching Shade to Your Skin Tone
Every shade rule above assumes a neutral starting point. Adjust for your own complexion before anything touches your face.
On lighter skin, bruises tend to look more vivid, so use the smallest possible amount of peach or orange and blend the edge in daylight. On medium and deeper skin, bruises often read as dark purple, brown or grey, and a bright peach corrector can look ashy or too light against the surrounding tone. Reach for a warmer, deeper corrector and build it in thin layers instead of jumping to a stronger shade.
Three checks catch almost every mismatch:
Compare the concealer on the jawline, not the wrist. Wrist skin is lighter and pinker than your face, and it lies about the match every time.
Look at the result in natural light, then again indoors. A color that disappears at the window can turn grey under office lighting.
Read the rim of the patch. A grey or muddy edge means the corrector is too dark. A pink or orange halo means it's too bright.
If you're building a broader routine for deeper skin, this dark skin care routine covers the prep that keeps tone even underneath. Choose cream formulas for opaque coverage, and avoid shimmer or glitter entirely, since light bouncing off the area is the opposite of what you want.
How to Cover a Bruise with Makeup Step by Step
The three tools that do the work
A small dense brush or clean fingertips for the corrector, because both press color into the bruise instead of pushing it around. A dense sponge for the concealer, since a porous sponge lays an even film that a fluffy brush can't. And a small fluffy brush for powder, used with a pressing motion.
Brushes are a bigger market than many realize: the global concealer-brush market was estimated at $284.6 million in 2025, with natural-hair brushes accounting for 52.3% of it, according to a 2025 concealer-brush market report. Natural hair holds powder well. For cream corrector and concealer, I would choose a small synthetic brush, because it washes clean and keeps its shape.
Here's the sequence, end to end.
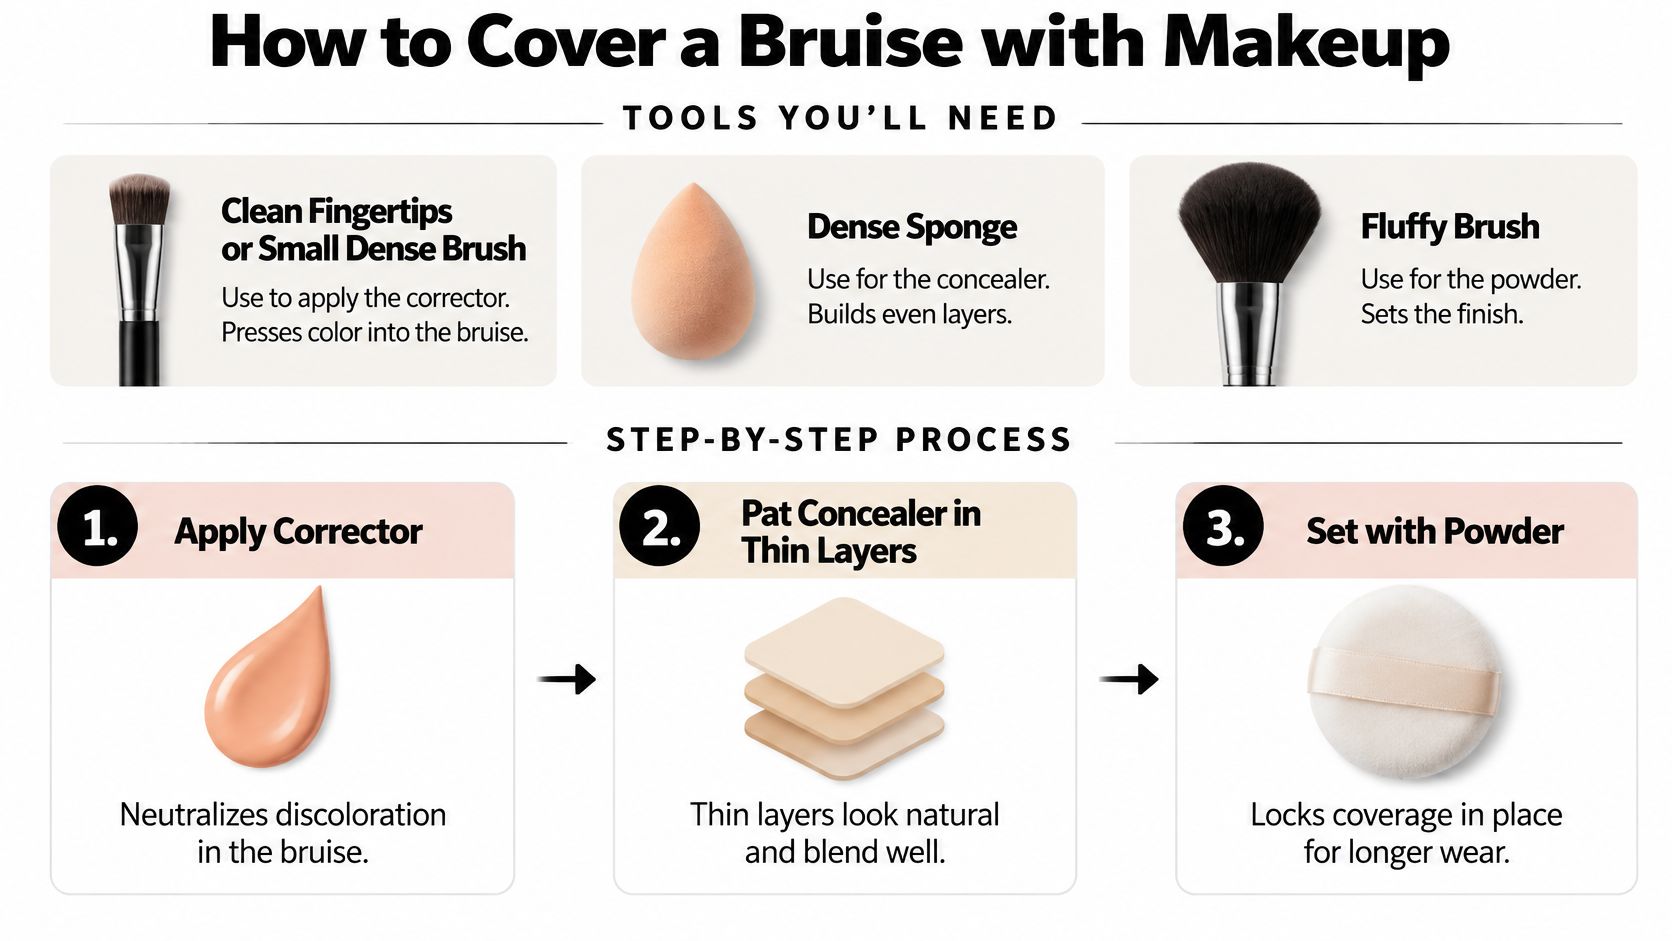
The eight steps
Check the skin. No open wounds, blisters, weeping, scabbing or active infection, and no recent procedure your clinician hasn't cleared. Product over a healing surface is the one mistake that turns a two-day bruise into a two-week problem.
Cleanse gently, pat dry, moisturize light. Give the moisturizer about a minute to sink in. Cream concealer grabs dry patches and reads as texture instead of coverage.
Read the hue in daylight. Stand at a window. Indoor bulbs push blue bruises toward grey and yellow bruises toward beige, and you'll pick the wrong corrector under them.
Tap a very small amount of corrector onto the discoloration only. Press it in with a fingertip or small dense brush and stop at the bruise's edge. Rubbing lifts the pigment you just placed and drags skin that's already tender.
Let the corrector set for 30 to 60 seconds. Skipping this is why corrector migrates under concealer and turns the whole patch orange.
Dab an opaque, skin-matched concealer over the corrector in a thin layer. Press with the sponge, don't sweep. One thin pass first, always.
Set with a small amount of pressed or translucent powder. Press the powder on with the fluffy brush. Sweeping moves the layers underneath and dulls the finish.
Blend the edges outward with a damp sponge. Work from the center of the patch toward clean skin so no hard line remains where the correction stops.
Motion is easier to copy than description. This short demo shows the pressure and the order of layers.
If you'd rather simplify to one product on healed skin, a tinted zinc cream covers and protects in a single pass. Expect a drier, more matte finish than a cream concealer, which shows texture more on the body than on the face.
A good result has no visible edge, the bruise no longer reads at arm's length, and your skin still looks like skin up close. If the area looks like a sticker, you've used too much.
How Many Layers Coverage Really Takes
The result is often lost by trying to finish in one coat. The best benchmark available comes from a 2021 prospective evaluation of a full-coverage cosmetic concealer in 30 women with a mean age of 42.03, all with mild-to-moderate bruising after injectable treatments or thread procedures. They were assessed on Day 0, Day 3 and Day 14, and the average participant needed 1.55 coats of product, with a standard deviation of 0.72, to cover adequately, as reported in the published study record.
The rest of the numbers back up what that average implies. Immediately after application, 78.18% were assessed as having clear skin with no visible erythema, and the remaining 21.82% had almost clear skin with only slight redness. 98.81% of participants were at least slightly satisfied with the result, and no product-related adverse events or allergic reactions were reported across an observation period of roughly two weeks.
What 1.55 coats means at your mirror
Plan for two thin coats, not one heavy one. The first coat neutralizes the color. The second hides what's left of it. Trying to hit full coverage in a single pass means a thicker layer, and a thick layer of corrector plus concealer is exactly what creases, catches powder and looks like a patch.
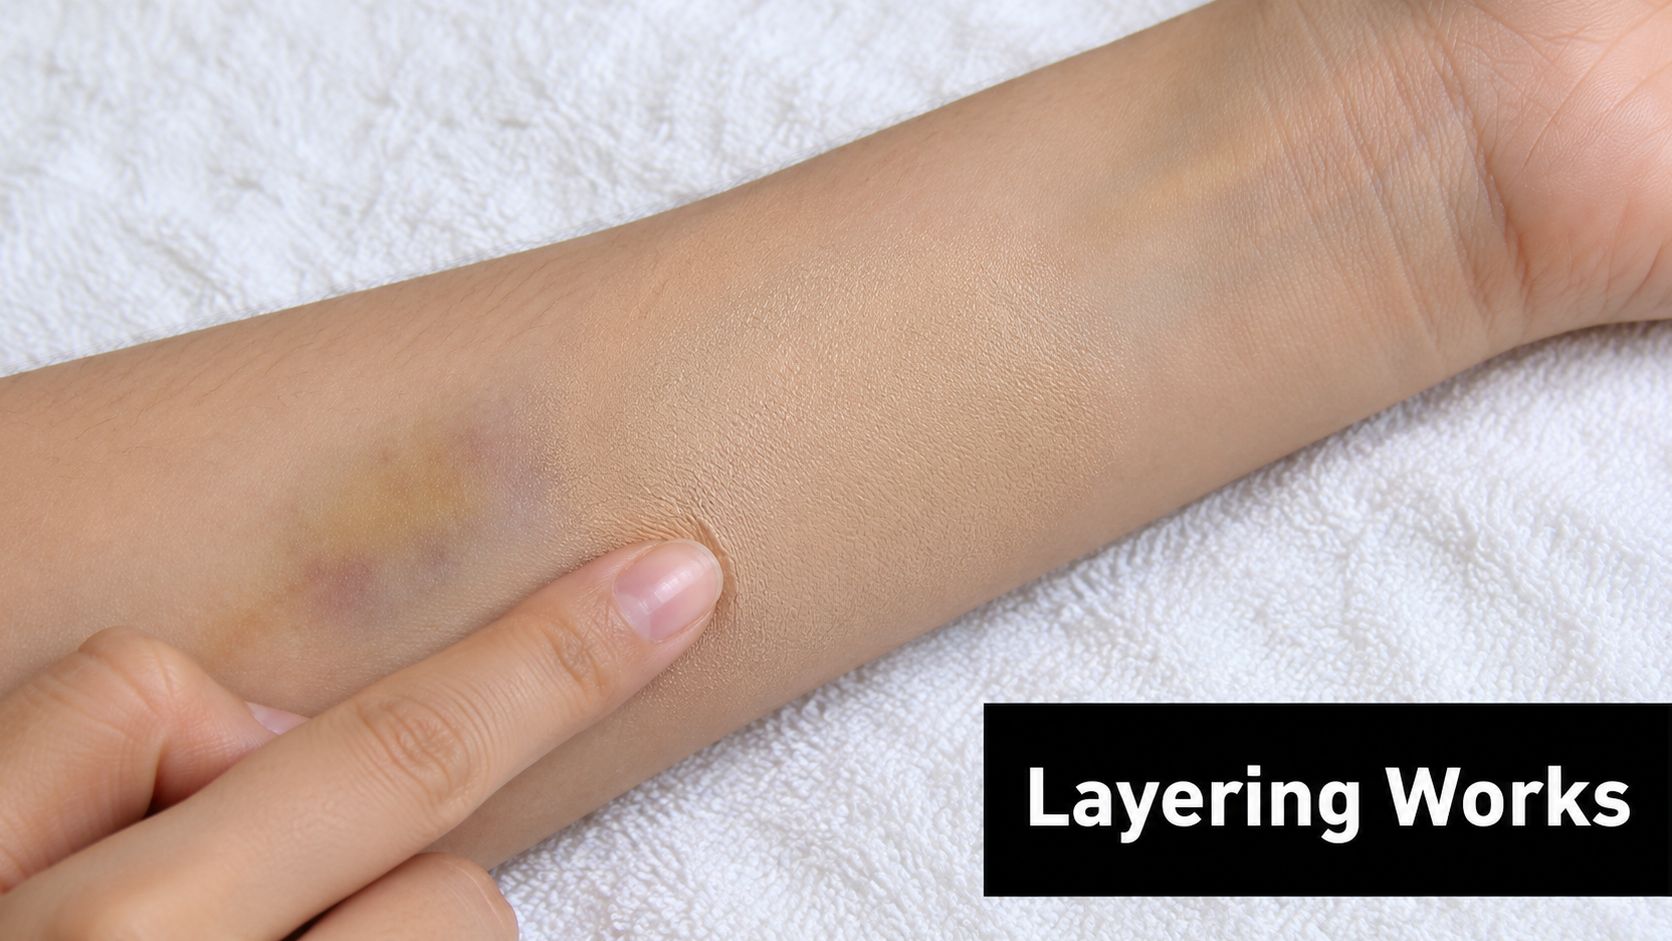
Adding the second coat takes about a minute. Let the first layer dry, go back in with corrector only where color still shows through, then a single thin concealer pass over that spot and a light press of powder. Resist the urge to re-cover the whole bruise. New product belongs only where the old layer failed.
The limit is worth stating plainly: the study measured cosmetic appearance, not accelerated healing. Nobody in it healed faster because of the concealer. Bruise covering makeup is a concealment tool, and the underlying bruise fades on its own schedule regardless of how well you've hidden it.
Fixing Cakey, Cast or Visible Bruises
The most common failure is a cakey, creased patch, and it almost always traces back to too much product or too much rubbing. Both are fixable in under two minutes. The problems that aren't fixable in two minutes are the ones where you need to stop and reassess rather than add another layer.
Symptom | Likely cause | Fix |
|---|---|---|
Cakey or creased look | Too much product or rubbing | Use less corrector, tap instead of rub, set with a light powder |
Orange or grey cast | Too much corrector or a shade that is too dark | Remove excess with a damp sponge, reapply a thinner layer in a closer match |
Bruise still shows through | Corrector too light or wrong hue for the stage | Add a second thin coat, letting the first dry before the next |
Product slides or flashes | Oil on skin or no setting step | Blot with tissue, then press on a small amount of pressed powder |
Stinging, itching or burning | Ingredient sensitivity to preservatives, fragrance or pigments | Stop, remove gently with a gentle cleanser, and ask a clinician |
Which fixes take minutes and which take days
Reducing product, switching from rubbing to tapping and blotting oil are all same-minute corrections. A bruise that still shows after two careful thin coats is a different situation: it usually needs a day or two of fading, not a third coat. Layering past two passes makes the patch obvious at arm's length, and obvious is worse than faint.
The orange or grey cast has one cause worth remembering. It's either too much corrector or a concealer that's too dark or too warm for the skin around it. Remove the excess with a damp sponge and start thinner. Going lighter on the concealer to "brighten" a bruise is a trap, because a paler patch against your own skin tone reads as a bright spot.
Stop signal: stinging, itching or burning isn't the product settling in. Take it off with a gentle cleanser and ask a clinician, since preservatives, fragrance and pigments can all trigger reactions.
If a laser session ever leaves you planning your week around a mark, we would rather you ask us about timing than guess at it. At NYC Laser Hair Removal in Westbury, every plan starts with a consultation where our team assesses your skin type and hair color and builds a personalized treatment plan, so questions about aftercare get answered before your first session rather than after. Visit NYC Laser Hair Removal to book a consultation and see which treatment zone and session package fits what you're treating.
Comments